Monday 29 August 2011

Happy Bank Holiday Monday !

Hello ! A short post for you today to share a little note card I made for a fellow blogger ! I purchased some gorgeous vintage satin ballet shoes from her which were just like a pair I had owned in the 70's and they were irresistible so this is my thank you card to her !


I used one of the little toppers which I shared with you in an earlier post and added lots of pretty stamped images and a lovely mother of pearl button to enhance the paper flower. I also inked the edges of the card in soft pink. It also includes a wonderful quote ! Handcrafted cards take very little time to make but there is always a hope that your card will be so much more appreciated and become a treasure that will be taken out and enjoyed for years to come. Moreover it is so easy to personalise a handmade card so it is perfect for the recipient !

All best wishes ~ Jane x

Sunday 28 August 2011

Last Days of Summer !

Hello !
It has been a week since I last posted and how the days have flown ! We seem to be into those last few precious Summer days which you just want to relish and for them never to end, but aren't the evenings starting to draw in ? Still there is lots to look forward to; I have some Papercraft classes starting very soon and have lots of lovely seasonal themes including a Christmas card club !!! Also very exciting, a new Stampin' Up catalogue is on the horizon with lots of new merchandise !!! I'll keep you posted !


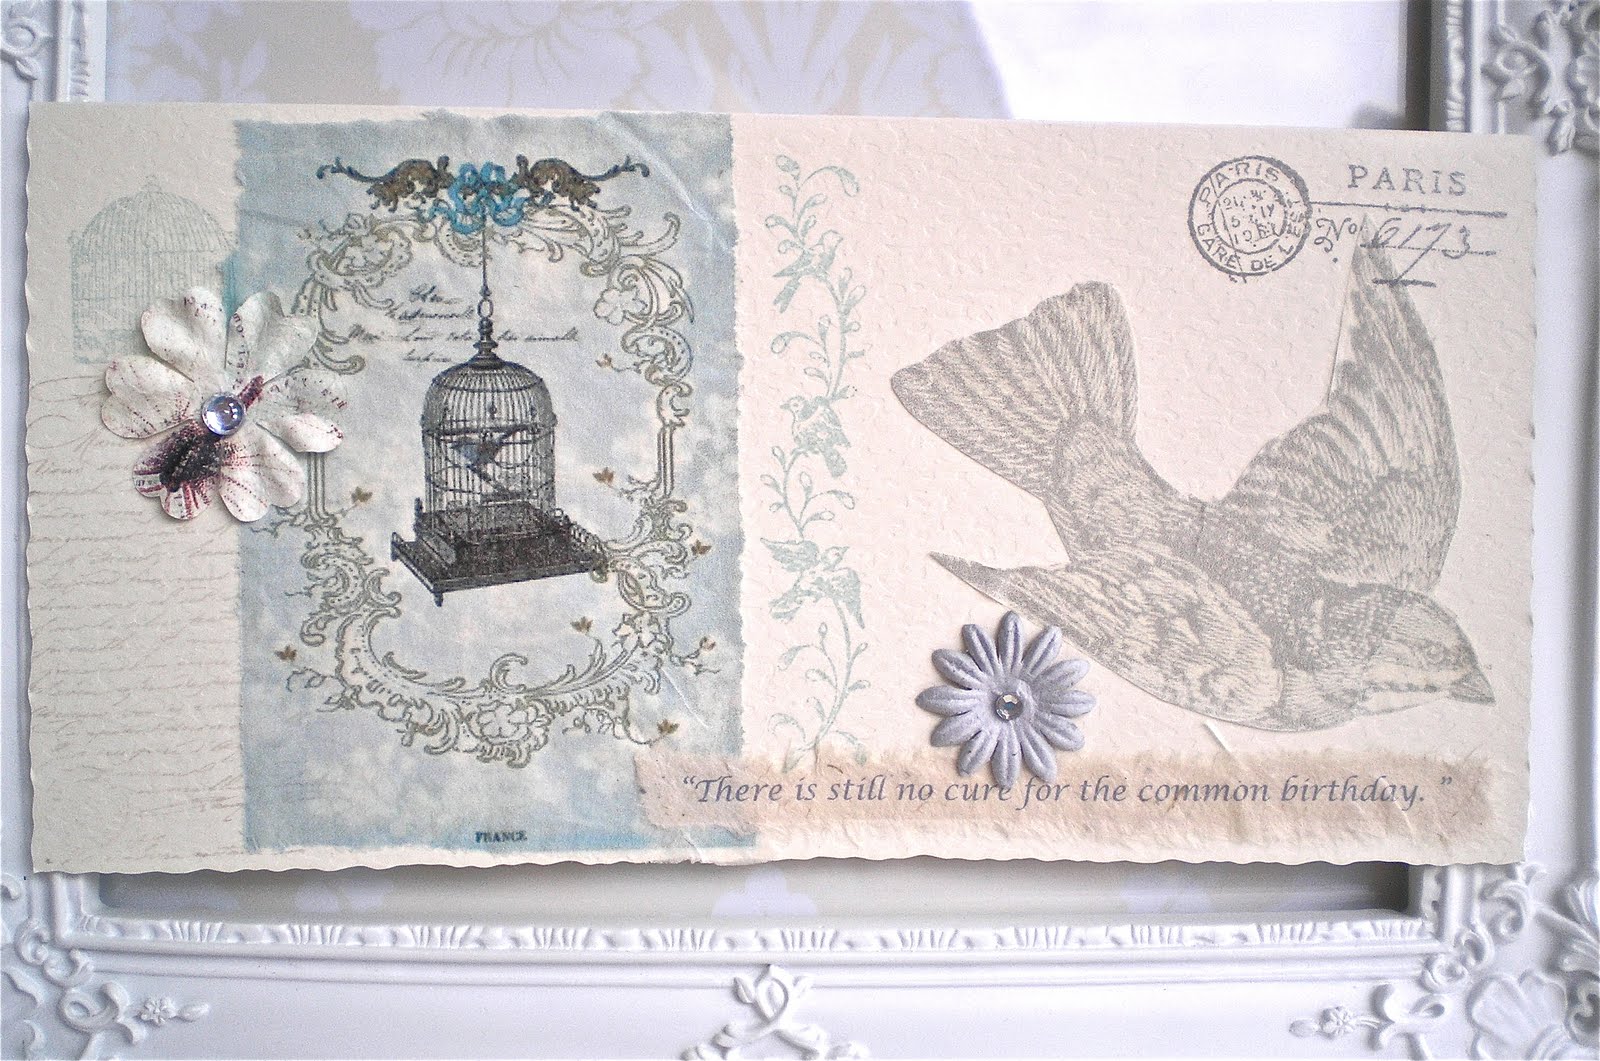
Today I have a simple invitation card to show you. I made these invites for the dinner party I gave for my daughter and her friends to celebrate her 18th birthday. I had to keep the card simple and elegant and Rosie chose a colour theme of ivory and wine red. On the day the room and table were also colour themed but I added in some cerise pink which sounds odd but it just lifted the scheme which was on a much bigger scale than the cards shown here. I also added table bling so everything sparkled when the candles were lit; it was very pretty !


The cardstock is pebbled and has a lovely texture, I then stamped a simple lace design to one side and overstamped a flourish to which I added a flower and some bling. The other side was given a punched edge and inked to highlight. The chandelier stamp was perfect for a dinner party and the whole card is very understated. Inside is a neat printed invite personalised for each guest; these are so easy to do on the computer nowadays and so long as you choose an appropriate font and colour co-ordinate everything it is simple to get a professional look !

Have you had a play with your inks and craft bits recently ? I don't mean have you crafted, but have you really played, got messy and experimented ? The cards above were purposefully made for a reason and I loved making them but sometimes it is so nice to sit down and just mess around and try new things. Most of us have craft bits which we have never played with, so get them and out, get a friend round to join you with a chocolate stash and some cupcakes and try some new techniques ! Better still, join a craft class, it's nice to craft with kindred spirits, there are lots starting up now and lots well established. My own Stampin' Up classes starting in the Autumn run in the Worcester/Malvern area and there are many all around the country run by other demonstrators, just check on the Stampin' Up UK website. My contact details are on my profile link above and I am looking for new class members, you will be made most welcome !!!
Today's quote tells you a lot about my approach to art and craft !

"Creativity is inventing, experimenting, growing, taking risks, breaking rules, making mistakes and HAVING FUN !!!" ~ Mary Lou Cook. 

Until next time, have a great week !
Hugs Jane x

Sunday 21 August 2011

Lazy Sunday Afternoon !

Hello ! What a gorgeous Sunday, hope it's as lovely where you are ? The title implies that I am having a day off today but actually Sundays tend to be very busy for me and I have lots of things I would like to achieve by the end if the day! Do you find that you set yourself just too much to do and feel a failure when you don't get everything done from a list that was just too unrealistic to achieve in the first place !!! I have solved this problem ! Stop making lists of things to do ! Life is too short, even at my age (very early 50's !) I find that given the chance, my diminishing brain cells can function quite well without a list and I feel I achieve much more without them ! Cannot manage without a diary though !!!


Anyway, enough of this waffle and back to the point of this post which is to share with you a little journal and card I made featuring a lovely little bird template. Search around on the web, you can easily find templates which kind crafters are happy to share for your personal use. I found this one years ago and thought the shape was so lovely and I have used it quite a lot.


This is an A5 card and has an inked background where I have blended two or three colours together and then stamped over in three colours and used a swirl and a flower sprig stamp to make a detailed background card. The scalloped circle has inked edges and then I cut out my birdie and edged him with faux stitching after having used more stamps to add detail to the body. The flowers are home made and ready made and add dimension to the card. This piece has a lot of work in it but the concept is still very simple; the success is in the placement of the elements and getting everything balanced. I spend a lot of time looking at other crafters work; we can all learn a lot from each other !


This journal started life as a chipboard blank and I covered the covers back and front, inside and out with a favourite paper and then sanded the edges with a file to make them smooth and add a bit of interest. Similar to the card in many ways but with the addition of some vintage mother of pearl buttons and pearl beads. I have stamped on patterned paper for both these projects and like the finished effect.


 I have used a very subtle colour pallet and mixed sage greens with coral and stone with a little duck egg blue thrown in with some sepia. Getting the right colours is so essential to your projects and this is where so many fall down. As you can see I tend to like vintage and subtle shades as a rule, but I do step out of my comfort zone and play around with different combinations. If you are new to crafting I would suggest you work in tried and tested combinations like shades of a single colour and an accent colour eg. shades of cream beige accented with sepia brown, charcoal grey or maybe even black. Of course classic black and white is always a winner but you could add in some shades of grey or even a silver metallic or pewter. Other classics are red, white and blue and to be different you could use vintage shades of these colours. If you are really struggling, find a colour wheel online that shows opposite colours that make striking combinations like orange/coral and kingfisher blue/green, use these with a neutral and you will have a successful combination for your project.

I really hope you find this info of some use, I want to try to give you the confidence to be creative and not be afraid to experiment and find you own unique style !

Thank you so much for stopping by, do come again !

Hugs Jane x


Wednesday 17 August 2011

Little Girl Stamp !

I have used this little stamp so much since I bought it back in March , and to be truthful I was drawn to it because it reminded me of my gorgeous daughter Rosie when she was around three to four years old ! She always wore a little hat when she went out, she had a whole collection of them, most of which we probably still have !


For this card I stamped in brown ( Early Expresso ink from Stampin' Up, they are the best inks ever and I just won't buy any others now ) and then picked up the pink with a watercolour brush just to accent the image. I have stamped onto handmade paper and torn and punched the edges before mounting onto a toile like paper, I haven't overmatched the colours, just chosen peachy tones to blend in. 
The card was for my daughter on completion of her exams this year !


I chalked over the general image for this one, which had been stamped onto lovely textured card and then mounted onto a pearlised card. Think about the textures you use and try and make some nice contrasts when planning your cards; remember, use good quality card for your base, you cannot make a silk purse out of a sow's ear !!! And no, that is not my quote for today's post although it is a great saying!  As my card's today feature a cute little bunny here is a quote from one of my favourite authors :

" Ideas are like rabbits. You get a couple and learn how to handle them, and pretty soon you have a dozen." ~ John Steinbeck

This really is true of creativity; you learn a few new skills which get your creative juices flowing and pick up hints and ideas from other crafters and soon you need to start keeping a design ideas notebook because your poor brain can't store it all !!! I keep several notebooks just to jot down ideas I have seen in shop window displays and magazines or on craft blogs like this one . I am considering one by my bedside as lots of ideas pop into my head at the end of the day !
Happy crafting ! Do come again soon !
Hugs Jane ! 


Thursday 11 August 2011

More Lovely Vintage !

Hello ! I found more vintage cards which I would like to share with you today ! I do love these pretty images and you can see by the repeats which are my favourites ! Some things are too lovely to use only once ! I have used a textured cardstock for most of these cards and like the broken effect of the stamped image you create. 


Many crafters use a layout template to plan cards and scrapbook pages and these are very useful and many ideas can be easily found online. However these can sometimes be too prescriptive and sometimes it's nice to experiment and just be creative. I keep little boxes of " elements " made up ready to add to cards and then just play around with bits until it looks right. I remember when I first started papercrafting about three years ago my first creations were 12 x 12 scrapbook pages ( I came to card making a little later ) and I had some lovely copies of old photos of my Mum, who is sadly no longer with us. I was so nervous about committing all the components to paper and I can honestly say that I fiddled around for literally hours !!! Any friends reading this will will verify this silliness ! I don't do this any more ! I just get on with it and  am usually more happy with the results many which occur by happy accident ! 
Helpful hint ! Always copy old photos for use in your crafting then you can keep the original and repeat copy when needed.


I like to print the envelope to tie in the design on the card.


I had a play stamping on tissue and embossing too and was pleased with the results. Textures add dimension and interest to your work and the little pearls add yet another element and bring the piece to life.


A little pleated square of stamped tissue paper makes a nice little bow to enhance your card !


If you are card making it is not essential to use acid and lignin free materials and I often add in bits of interesting paper that I find in packaging and catalogues which are too good to put into  paper recycling. The pale aqua  in this card came from a skincare catalogue and had a white core and tore nicely so I inked the edge and stamped it in white to mount my butterfly on.

Thank you for stopping by; hope I have given you some inspiration !
I can make cards to order if you don't have the time to create yourself and are looking for something a little different and I can be contacted via the link on my profile above. I am also happy to give free advice by e~mail about any of the ideas or techniques show on my blog, again contact via the link !

Do stop by again ! Have a good day ! 
Hugs Jane x


Monday 8 August 2011

Back to Reality !

Hello,
Sorry not to have posted for a while, I have just returned from a lovely break in the Lakes mostly spent messing around in boats on the water, taking in gorgeous views of the fells and watching our eighteen year old daughter enjoying a return to childhood after the stress of "A" levels,  just chilling and playing with our lovely Springers and having some well deserved fun !!!


I have some vintage style cards for you today using free vintage images printed onto tissue and vellum papers. I have used a limited colour pallet of ivory, parchment and sepia and these cards all have some great quotes. I like to make these up to have in stock ready for that moment when you need a card urgently ! I have used a "typewriter" style font for the quotes and printed onto parchment paper. These little cards are mainly unplanned; I start with the quote and add some stamping and a little dimension in the form of a small flower.


Vintage script looks great overstamped and on this card I've picked up the olive green in the birdie and used it as a accent colour in the stamping and the flower and jewel. Here's a close up !


These cards all have a similar theme of soft colours and torn tissue paper images and a recurring nature element. They can be used for so many occasions and each one is unique, so get out your stamps and vintage inks, find a few free images on line and get printing !  Hot tip ! Use any tissue paper ( unless these ideas are to be incorporated into your scrapbooking in which case keep everything acid and lignin free so your photos are archive safe ), and put the tissue through the printer with a single sheet of regular printer paper. Think about how your printer feeds so the tissue is uppermost to take the ink. The regular paper will "support" the tissue so you printer doesn't eat it !!!


Another of a kind with some pastel pearls to accent.


The beauty of these little cards is that you can play around with the placement of the images before you glue and if something looks imbalanced add some stamping or a dimension; remember, there are no rules !!!
I'm off now to catch up with something a little more mundane now I've had fun posting on my blog ! Hope you've enjoyed your visit!
 Hugs Jane x